前言
之前一直是本地生成静态页面,然后 deploy 到仓库里。但觉得这样不够优雅,并且想要临时修改的话就只能在电脑上修改,其他移动设备上无法临时修改。所以参考https://akilar.top/posts/f752c86d/ Akilar大佬的博客,对我的博客进行修改,也从一个小白的视角进行记录。(这篇文章就是采用新的部署方式)
准备
准备两个仓库,一个 private,一个 public。
private 用于存储 hexo 源码,(为什么是 private?因为要用到 token 信息)。用于监测 push,然后把生成的静态文件推送到这个 public 的仓库里。
public 起名 istomoyo(你的用户名).github.io。
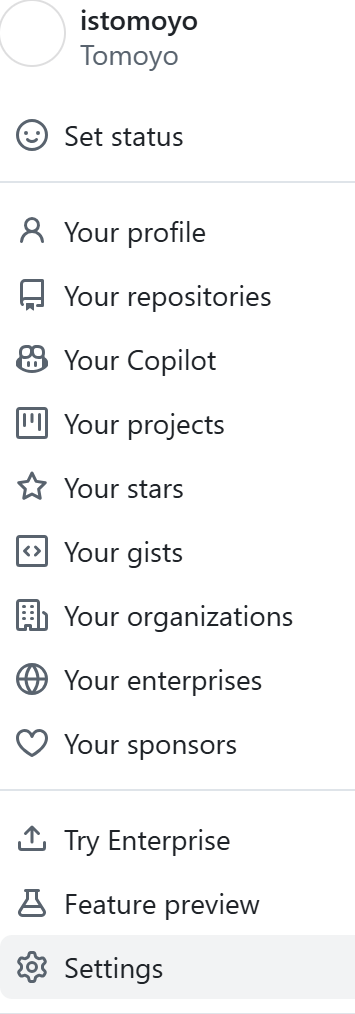
获取 Token
[Github->头像(右上角)->Settings->Developer Settings->Personal access tokens->
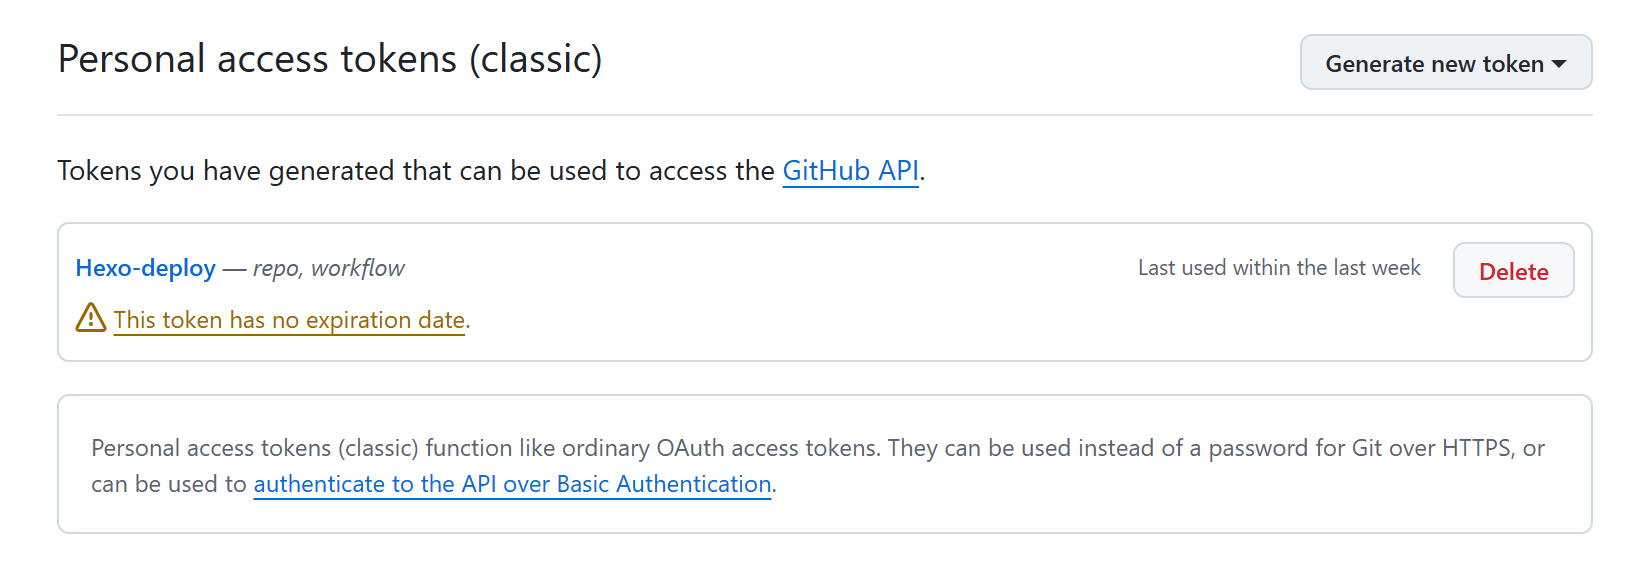
在这 Token(classic)
Generate new token
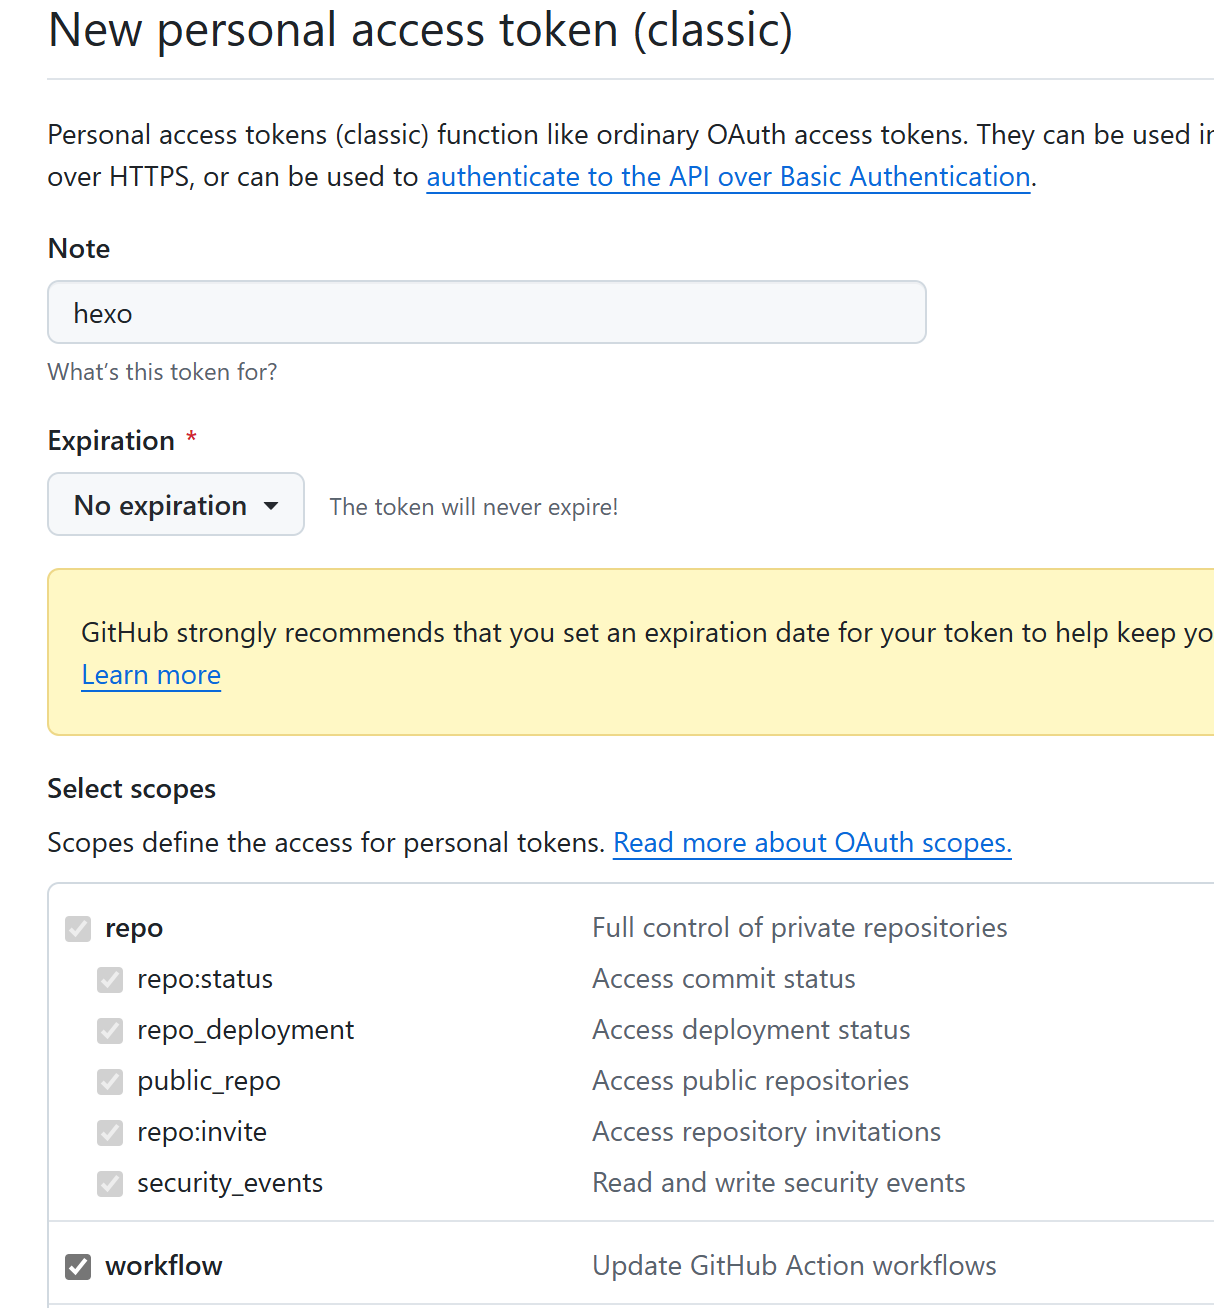
名称随便起,时长选择永久,勾选 workflow 和 repo
获取生成后的 token,临时保存一下(忘记就只能重新生成)
配置 private 仓库
private(就是你存放 hexo 源码)
新建.github/workflows/autodeploy.yml 文件。
1
2
3
4
5
6
7
8
9
10
11
12
13
14
15
16
17
18
19
20
21
22
23
24
25
26
27
28
29
30
31
32
33
34
35
36
37
38
39
40
41
42
43
44
45
46
47
48
49
50
51
52
53
54
55
56
57
58
59
60
61
62
63
|
name: 自动部署
on:
push:
branches:
- main
release:
types:
- published
jobs:
deploy:
runs-on: ubuntu-latest
steps:
- name: 检查分支
uses: actions/checkout@v4
with:
ref: main
- name: 安装 Node
uses: actions/setup-node@v4
with:
node-version: "20.13.0"
- name: 安装 Hexo
run: |
export TZ='Asia/Shanghai'
npm install hexo-cli -g
- name: 缓存 Hexo
uses: actions/cache@v3
id: cache
with:
path: node_modules
key: ${{ runner.os }}-${{ hashFiles('**/package-lock.json') }}
restore-keys: |
${{ runner.os }}-
- name: 安装依赖
if: steps.cache.outputs.cache-hit != 'true'
run: |
npm install --save
- name: 生成静态文件
run: |
hexo clean
hexo generate
- name: 部署
run: |
cd ./public
git config --global init.defaultBranch main
git init
git config --global user.name '${{ secrets.GITHUBUSERNAME }}'
git config --global user.email '${{ secrets.GITHUBEMAIL }}'
git add .
git commit -m "${{ github.event.head_commit.message }} $(date +"%Z %Y-%m-%d %A %H:%M:%S") Updated By Github Actions"
git push --force --quiet "https://${{ secrets.GITHUBUSERNAME }}:${{ secrets.GITHUBTOKEN }}@github.com/${{ secrets.GITHUBUSERNAME }}/${{ secrets.GITHUBUSERNAME }}.github.io.git" main:main
# git push --force --quiet "https://${{ secrets.TOKENUSER }}:${{ secrets.CODINGTOKEN }}@e.coding.net/${{ secrets.CODINGUSERNAME }}/${{ secrets.CODINGBLOGREPO }}.git" main:main # Coding 部署
# git push --force --quiet "https://${{ secrets.GITEEUSERNAME }}:${{ secrets.GITEETOKEN }}@gitee.com/${{ secrets.GITEEUSERNAME }}/${{ secrets.GITEEUSERNAME }}.git" main:main # Gitee 部署
|
需要注意的是,2020 年 10 月后 github 新建仓库默认分支改为 main。注意你仓库中是什么分支。
都是 main 分支的话,需要加上
1
| git config --global init.defaultBranch main
|
使得所有新初始化的仓库默认分支名称为 main 而不是 master。
佬的博客下面的评论也提到了。
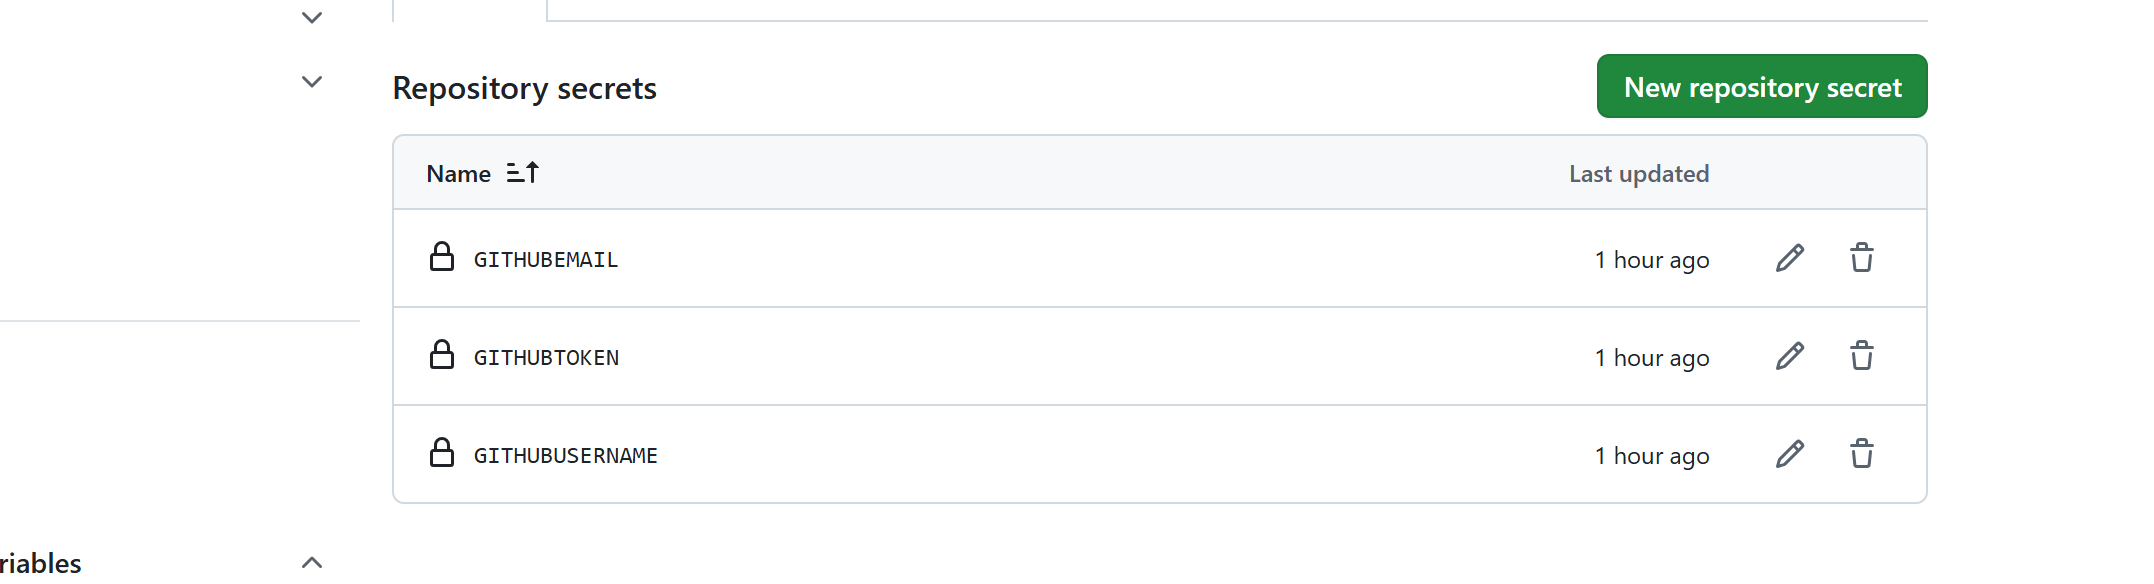
之后需要自己到仓库(private 的那个)的 Settings->Secrets->actions 下添加环境变量
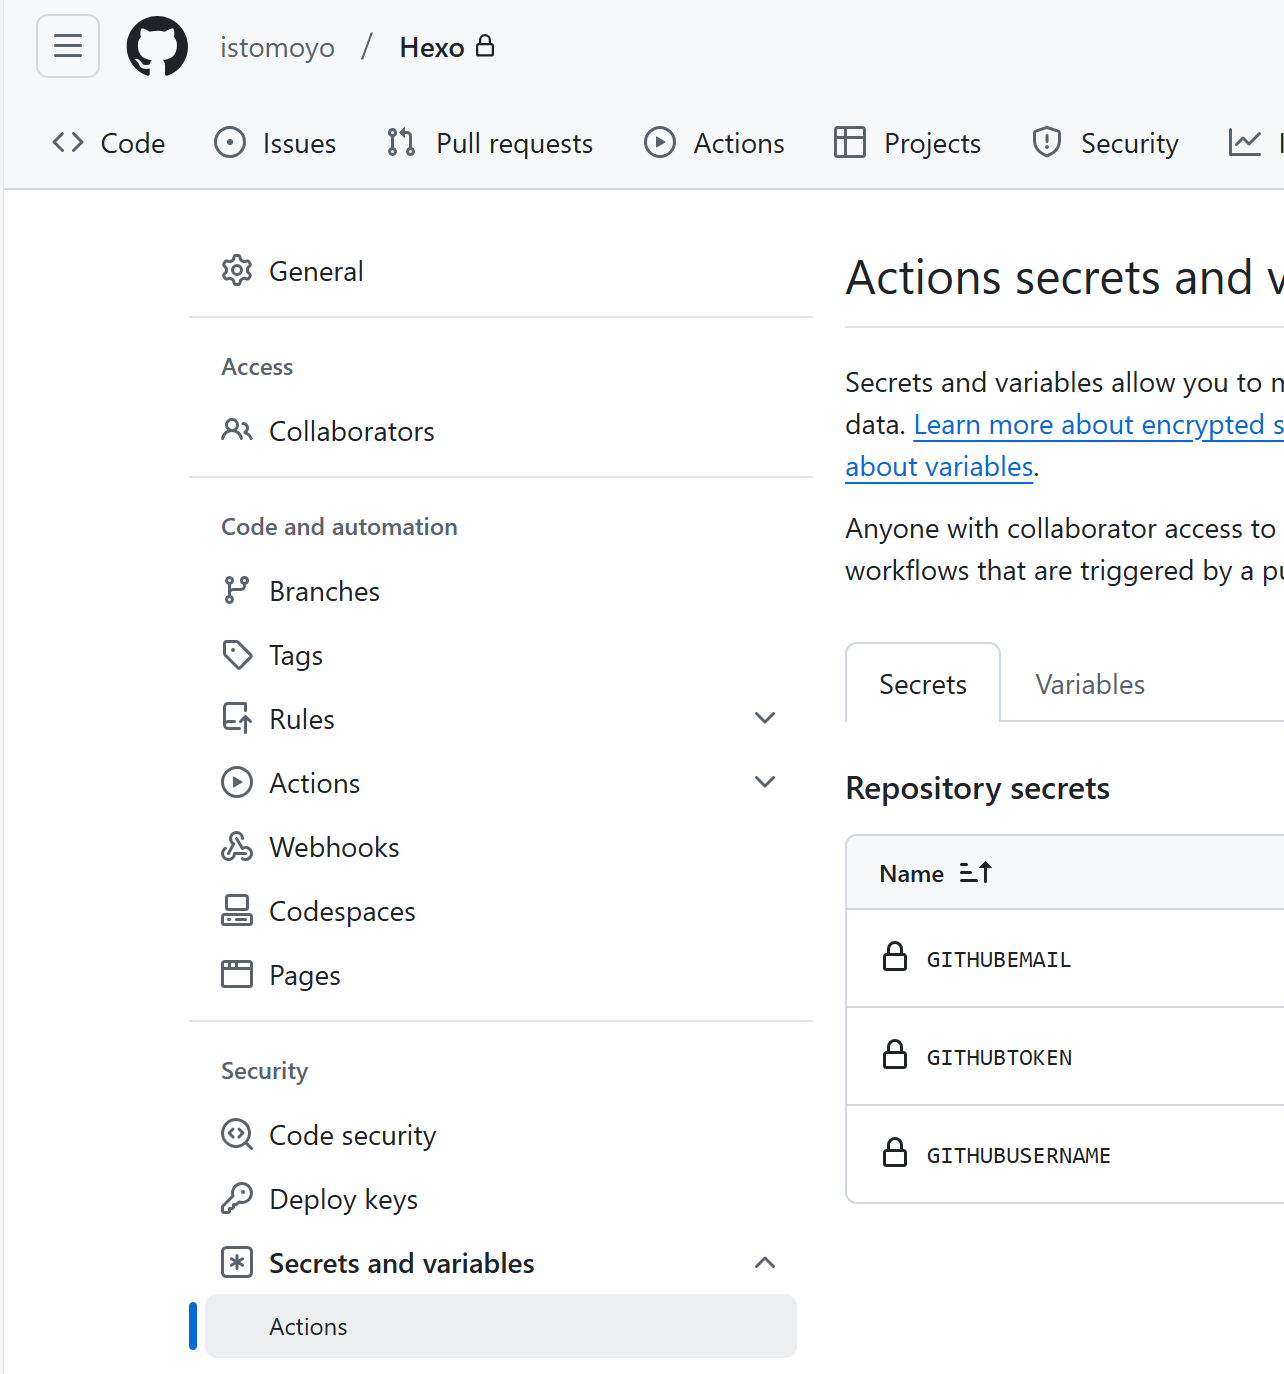
需要添加三个变量(点击右边的 New reposistory secret 添加)
| Name |
Value |
是什么 |
| GITHUBUSERNAME |
istomoyo |
github 用户名 |
| GITHUBEMAIL |
*** |
github 绑定的邮箱 |
| GITHUBTOKEN |
*** |
刚才让你保存的 token |
细微部分
在你的主题文件夹下(themes/butterfly/.git),我的是 butterfly。删除或者移动他,否则 git 不会让你 push 的。
添加屏蔽项(在.gitignore 文件中)
为了减少上传的文件,加快提交速度。(这个可以根据自己的情况来决定怎么写)
1
2
3
4
5
6
7
8
9
10
| .DS_Store
Thumbs.db
db.json
*.log
node_modules/
public/
.deploy*/
.deploy_git*/
.idea
themes/butterfly/.git
|
之后再推送到对应的仓库就 ok 了。
参考
1
2
3
| git add .
git commit -m "github action update" #引号内的内容可以自行更改作为提交记录。
git push origin main
|
可以在对应 github action 查看部署情况
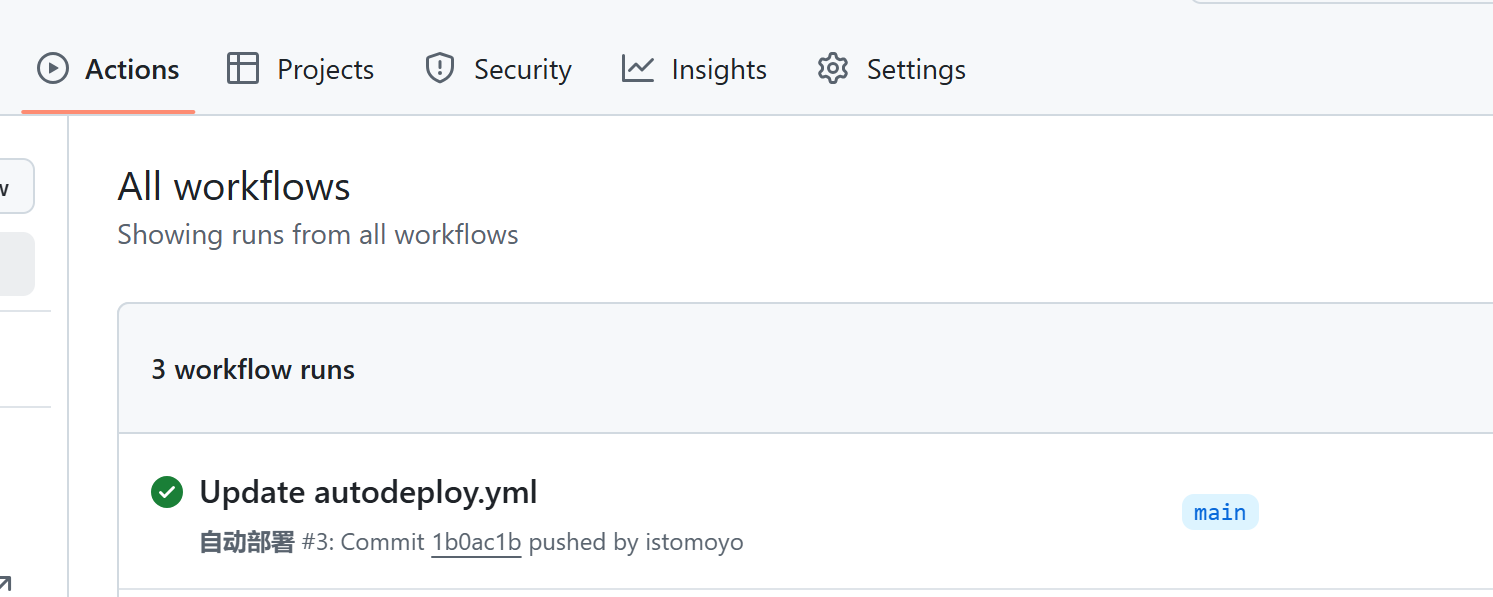
这样应该就 ok 了。可以试试看
