小满 zs-TypeScript 简介
链接:小满 TypeScript 基础教程全集(完结)
学习 TypeScript19(Mixins 混入) TypeScript 混入 Mixins 其实 vue 也有mixins这个东西 你可以把他看作为合并
对象混入 可以使用 es6 的Object.assign合并多个对象
此时people 会被推断成一个交差类型 Name & Age & sex;
1
2
3
4
5
6
7
8
9
10
11
12
13
14
15
16
17
18
19
20
21
interface Name { name: string } interface Age { age: number } interface Sex { sex: number } let people1: Name = { name: "小满" } let people2: Age = { age: 20 } let people3: Sex = { sex: 1 } //扩展运算符 浅拷贝 返回新的类型 let c = {...people1,...people2,...people3}; //2. Object.assign 浅拷贝 交叉类型 const people = Object.assign(people1,people2,people3) //3. 深拷贝 structuredClone(people1)
类的混入 首先声明两个mixins类 (严格模式要关闭不然编译不过)
1
2
3
4
5
6
7
8
9
10
11
12
13
14
class A { type: boolean = false; changeType() { this.type = !this.type } } class B { name: string = '张三'; getName(): string { return this.name; } }
下面创建一个类,结合了这两个mixins
首先应该注意到的是,没使用extends而是使用implements。 把类当成了接口
我们可以这么做来达到目的,为将要mixin进来的属性方法创建出占位属性。 这告诉编译器这些成员在运行时是可用的。 这样就能使用mixin带来的便利,虽说需要提前定义一些占位属性
1
2
3
4
5
6
class C implements A,B{ type:boolean changeType:()=>void; name: string; getName:()=> string }
最后,创建这个帮助函数,帮我们做混入操作。 它会遍历mixins上的所有属性,并复制到目标上去,把之前的占位属性替换成真正的实现代码
Object.getOwnPropertyNames()可以获取对象自身的属性,除去他继承来的属性,
1
2
3
4
5
6
7
8
Mixins(C, [A, B]) function Mixins(curCls: any, itemCls: any[]) { itemCls.forEach(item => { Object.getOwnPropertyNames(item.prototype).forEach(name => { curCls.prototype[name] = item.prototype[name] }) }) }
1
2
3
4
5
6
7
8
9
10
11
12
13
14
15
16
17
18
19
20
21
22
23
24
25
26
27
28
29
30
31
32
33
34
35
36
37
38
39
40
41
42
43
44
45
46
47
//插件类型的混入 class Logger{ log(msg:string){ console.log("log"); } } class Html{ render(){ console.log('render'); } } class App{ run(){ console.log('run'); } } //类型约束 type Constructor<T> = new (...args:any[])=>T //插件类型的混入 function plugMixins<T extends Constructor<App>>(base:T){ return class extends base{ private Logger = new Logger() private Html = new Html() constructor(...args:any[]){ super(...args) this.Logger = new Logger(); this.Html = new Html(); } run(){ this.Logger.log('run') } render(){ this.Logger.log('render') this.Html.render() } } } const mixins = plugMixins(App); const app = new mixins(); app.run();
学习 TypeScript20(装饰器 Decorator)
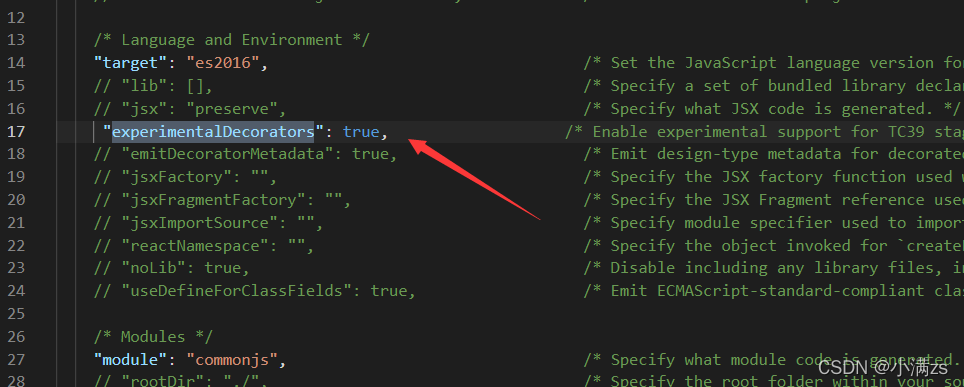
Decorator 装饰器是一项实验性特性,在未来的版本中可能会发生改变
若要启用实验性的装饰器特性,你必须在命令行或 tsconfig.json 里启用编译器选项
装饰器 装饰器是一种特殊类型的声明,它能够被附加到类声明,方法, 访问符,属性或参数上。
首先定义一个类
1
2
3
4
5
class A { constructor() { } }
定义一个类装饰器函数 他会把 ClassA 的构造函数传入你的 watcher 函数当做第一个参数
1
2
3
4
5
const watcher: ClassDecorator = (target: Function) => { target.prototype.getParams = <T>(params: T):T => { return params } }
使用的时候 直接通过@函数名使用
1
2
3
4
5
6
@watcher class A { constructor() { } }
验证
1
2
const a = new A(); console.log((a as any).getParams('123'));
1
2
3
4
5
6
7
8
9
10
11
12
13
14
15
16
//1.类装饰器 ClassDecorator const Base:ClassDecorator = (target) =>{ console.log(target); target.prototype.xiaoman = '小满' target.prototype.fn = () =>{ console.log('我是韩寒'); } } @Base class Http{ } const http = new Http() as any; console.log(http)
装饰器工厂 其实也就是一个高阶函数 外层的函数接受值 里层的函数最终接受类的构造函数
1
2
3
4
5
6
7
8
9
10
11
12
13
14
15
16
17
18
19
20
const watcher = (name: string): ClassDecorator => { return (target: Function) => { target.prototype.getParams = <T>(params: T): T => { return params } target.prototype.getOptions = (): string => { return name } } } @watcher('name') class A { constructor() { } } const a = new A(); console.log((a as any).getParams('123'));
1
2
3
4
5
6
7
8
9
10
11
12
13
14
15
16
17
//2. 装饰器工厂 const Base = (name: string) => { const fn: ClassDecorator = (target) => { console.log(target); target.prototype.xiaoman = name; target.prototype.fn = () => { console.log("我是韩寒"); }; }; return fn }; @Base('xiao yu') class Http {} const http = new Http() as any; console.log(http.xiaoman);
装饰器组合 就是可以使用多个装饰器
1
2
3
4
5
6
7
8
9
10
11
12
13
14
15
16
17
18
19
20
21
22
23
24
25
26
27
28
29
30
const watcher = (name: string): ClassDecorator => { return (target: Function) => { target.prototype.getParams = <T>(params: T): T => { return params } target.prototype.getOptions = (): string => { return name } } } const watcher2 = (name: string): ClassDecorator => { return (target: Function) => { target.prototype.getNames = ():string => { return name } } } @watcher2('name2') @watcher('name') class A { constructor() { } } const a = new A(); console.log((a as any).getOptions()); console.log((a as any).getNames());
方法装饰器 1 2 3 4 5 6 7 8 9 10 11 12 13 14 15 16 17 18 const Get = (url: string) => { const fn: MethodDecorator = (target, key, descriptor: PropertyDescriptor) => { console.log("target,key,descriptor :>> ", target, key, descriptor); axios.get(url).then((res) => { descriptor.value(res.data); }); }; return fn; }; @Base("xiao yu") class Http { @Get("https://api.apiopen.top/api/getHaoKanVideo?page=0&size=10") getList(data: any) { console.log("data :>> ", data.result.list); } create() {} }
参数装饰器 返回三个参数
对于静态成员来说是类的构造函数,对于实例成员是类的原型对象。
1 2 3 4 5 6 7 8 9 10 11 12 13 14 15 [ {}, 'setParasm', 0 ] const met:ParameterDecorator = (...args) => { console.log(args); } class A { constructor() { } setParasm (@met name:string = '213') { } } const a = new A();
1 2 3 4 5 6 7 8 9 10 11 12 13 14 15 16 17 18 19 20 21 22 23 24 25 26 27 28 29 30 31 32 33 34 35 36 37 38 39 40 41 42 43 44 45 46 47 import axios from "axios"; import "reflect-metadata"; const Base = (name: string) => { const fn: ClassDecorator = (target) => { console.log(target); target.prototype.xiaoman = name; target.prototype.fn = () => { console.log("我是韩寒"); }; }; return fn; }; const Get = (url: string) => { const fn: MethodDecorator = ( target, _: any, descriptor: PropertyDescriptor ) => { //console.log("target,key,descriptor :>> ", target, key, descriptor); const key = Reflect.getMetadata("key", target); axios.get(url).then((res) => { descriptor.value(key ? res.data[key] : res.data); }); }; return fn; }; const Result = () => { const fn: ParameterDecorator = (target, key, index) => { console.log("target,key,index :>> ", target, key, index); Reflect.defineMetadata("key", "result", target); }; return fn; }; @Base("xiao yu") class Http { @Get("https://api.apiopen.top/api/getHaoKanVideo?page=0&size=10") getList(@Result() data: any) { console.log("data :>> ", data); } create() {} } const http = new Http() as any; console.log(http.xiaoman);
学习 TypeScript22(实战 TS 编写发布订阅模式) 发布订阅模式是一种常见的设计模式,在许多场景中都有应用。我们可能已经在使用中接触过发布订阅模式,比如使用 addEventListener 方法来监听 DOM 事件、Vue 的事件总线机制等。
1 2 3 4 5 6 7 8 9 10 11 12 13 14 15 16 17 18 19 20 21 22 //举例-自定义事件 const cb = () => { console.log("触发了"); }; document.addEventListener( "asd", () => { console.log("触发了"); }, { once: true, } ); document.removeEventListener("asd", cb); const e = new Event("asd"); document.dispatchEvent(e);
1 2 3 4 5 6 7 8 9 10 11 12 13 14 15 16 17 18 19 20 21 22 23 24 25 26 27 28 29 30 31 32 33 34 35 36 37 38 39 40 41 42 43 44 45 46 47 48 49 50 51 52 53 54 //需要实现:once on emit off 订阅中心Map<事件名称,[Function]> interface I { events: Map<string, Function[]>; once: (event: string, callback: Function) => void; //触发一次订阅器 on: (event: string, callback: Function) => void; //订阅 emit: (event: string, ...args: any[]) => void; //派发 off: (event: string, callback: Function) => void; //删除监听器 } class Emitter implements I { events: Map<string, Function[]>; constructor() { this.events = new Map(); } once(event: string, callback: Function) { const cb = (...args: any[]) => { callback(...args); this.off(event, cb); }; this.on(event, cb); } off(event: string, callback: Function) { const callbackList = this.events.get(event); if (callbackList) { callbackList.splice(callbackList.indexOf(callback), 1); } } on(event: string, callback: Function) { if (this.events.has(event)) { const callbackList = this.events.get(event); callbackList && callbackList.push(callback); } else { this.events.set(event, [callback]); } } //订阅 emit(event: string, ...args: any[]) { const callbackList: Function[] = this.events.get(event); console.log("callbackList :>> ", callbackList); if (callbackList) { callbackList.forEach((fn: Function) => { fn(...args); }); } } //派发 } const bus = new Emitter(); const fn = (b: Boolean, n: Number) => { console.log(1); }; bus.on("message", fn); bus.off("message", fn); bus.once("message", fn); bus.emit("message", false, 1);
学习typeScript(weakMap,weakSet,set,map) 在es5的时候常用的Array object ,在es6又新增了两个类型,Set和Map,类似于数组和对象。
set 集合是由一组无序且唯一(即不能重复)的项组成的,可以想象成集合是一个既没有重复元素,也没有顺序概念的数组
属性
size:返回字典所包含的元素个数
操作方法
add(value):添加某个值,返回 Set 结构本身。
delete(value):删除某个值,返回一个布尔值,表示删除是否成功。
has(value):返回一个布尔值,表示该值是否为 Set 的成员。
clear():清除所有成员,无返回值。
size: 返回set数据结构的数据长度
1 2 3 4 5 6 7 8 9 let set:Set<number> = new Set([1,2,3,4]) set.add(5) set.has(5) set.delete(5) set.size //4
去重
1 2 3 let arr = [...new Set([1,1,1,2,2,3,4,5,5,5,5])] console.log(arr); //[ 1, 2, 3, 4, 5 ]
Map 它类似于对象,也是键值对的集合,但是“键”的范围不限于字符串,各种类型的值(包括对象)都可以当作键,是一种更完善的 Hash 结构实现。如果你需要“键值对”的数据结构,Map 比 Object 更合适
1 2 3 4 5 6 7 8 9 10 11 12 let obj = { name: '小满' } let map: Map<object, Function> = new Map() map.set(obj, () => 123) map.get(obj) map.has(obj) map.delete(obj) map.size
操作方法同set
WeakSet 和 WeakMap Weak 在英语的意思就是弱的意思,weakSet 和 weakMap 的键都是弱引用,不会被计入垃圾回收,我们来演示一下。
首先obj引用了这个对象 + 1,aahph也引用了 + 1,wmap也引用了,但是不会 + 1,应为他是弱引用,不会计入垃圾回收,因此 obj 和 aahph 释放了该引用 weakMap 也会随着消失的,但是有个问题你会发现控制台能输出,值是取不到的,应为V8的GC回收是需要一定时间的,你可以延长到500ms看一看,并且为了避免这个问题不允许读取键值,也不允许遍历,同理weakSet 也一样
1 2 3 4 5 6 7 8 9 10 11 12 13 let obj:any = {name:'小满zs'} //1 let aahph:any = obj //2 let wmap:WeakMap<object,string> = new WeakMap() wmap.set(obj,'爱安徽潘慧') //2 他的键是弱引用不会计数的 obj = null // -1 aahph = null;//-1 //v8 GC 不稳定 最少200ms setTimeout(()=>{ console.log(wmap) },500)
学习TypeScript23(TS进阶用法proxy & Reflect) 学习proxy对象代理 Proxy 对象用于创建一个对象的代理,从而实现基本操作的拦截和自定义(如属性查找、赋值、枚举、函数调用等)
target
要使用 Proxy 包装的目标对象(可以是任何类型的对象,包括原生数组,函数,甚至另一个代理)。
handler
一个通常以函数作为属性的对象,各属性中的函数分别定义了在执行各种操作时代理 p 的行为。
handler.get() 本次使用的get
属性读取操作的捕捉器。
handler.set() 本次使用的set
属性设置操作的捕捉器。
Reflect 与大多数全局对象不同Reflect并非一个构造函数,所以不能通过new运算符对其进行调用,或者将Reflect对象作为一个函数来调用。Reflect的所有属性和方法都是静态的(就像Math对象)
Reflect.get(target, name, receiver)
Reflect.set(target, name,value, receiver)
1 2 3 4 5 6 7 8 9 10 11 12 13 14 15 16 17 18 19 20 21 22 23 24 25 26 27 28 29 30 31 32 33 34 35 type Person = { name: string, age: number, text: string } const proxy = (object: any, key: any) => { return new Proxy(object, { get(target, prop, receiver) { console.log(`get key======>${key}`); return Reflect.get(target, prop, receiver) }, set(target, prop, value, receiver) { console.log(`set key======>${key}`); return Reflect.set(target, prop, value, receiver) } }) } const logAccess = (object: Person, key: 'name' | 'age' | 'text') => { return proxy(object, key) } let man: Person = logAccess({ name: "小满", age: 20, text: "我的很小" }, 'age') man.age = 30 console.log(man);
使用泛型+keyof优化
1 2 3 4 5 6 7 8 9 10 11 12 13 14 15 16 17 18 19 20 21 22 23 24 25 26 27 28 29 30 31 32 33 34 35 36 37 38 39 40 41 42 43 type Person = { name: string, age: number, text: string } const proxy = (object: any, key: any) => { return new Proxy(object, { get(target, prop, receiver) { console.log(`get key======>${key}`); return Reflect.get(target, prop, receiver) }, set(target, prop, value, receiver) { console.log(`set key======>${key}`); return Reflect.set(target, prop, value, receiver) } }) } const logAccess = <T>(object: T, key: keyof T): T => { return proxy(object, key) } let man: Person = logAccess({ name: "小满", age: 20, text: "我的很小" }, 'age') let man2 = logAccess({ id:1, name:"小满2" }, 'name') man.age = 30 console.log(man);
案例简单实现一个mobx观察者模式
1 2 3 4 5 6 7 8 9 10 11 12 13 14 15 16 17 18 19 20 21 22 23 24 25 26 const list: Set<Function> = new Set() const autorun = (cb: Function) => { if (cb) { list.add(cb) } } const observable = <T extends object>(params: T) => { return new Proxy(params, { set(target, key, value, receiver) { const result = Reflect.set(target, key, value, receiver) list.forEach(fn => fn()) console.log(list) return result } }) } const person = observable({ name: "小满", attr: "威猛先生" }) autorun(()=>{ console.log('我变化了') }) person.attr = '威猛个捶捶'